Driftwood Sailboat Tutorial – Sail Away
1) Time to get your sewing box out! I have a wooden box with two compartments, one for ribbons and strings and one for everything else. This helps me stay organised and I can see everything I’ve got to work with at a glance.
2) Now choose a colour theme and decide on your chosen fabric, as a general rule I always stick to either complimentary colours or contrast colours.
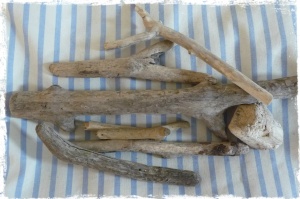
3) Select two pieces of driftwood which can be used for your hull and a mast, there’s no wrong way and that’s part of the fun as long as it looks in proportion.
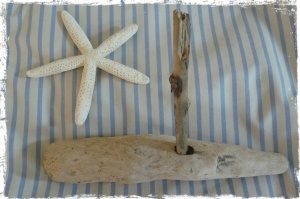
4) I was really lucky and found a piece of driftwood with a hole already in the hull! You will need to drill a hole large enough to fit your mast into.
5) Use glue to secure your mast into the hole. I used a glue gun but you can use craft glue.
6) Lay your boat on top of your chosen fabric. This will need to be doubled over to make the fronts and backs of your sails. I chose a fabric with a frayed edge for detail.
7) Now draw your sails onto your fabric, I used a coloured pencil and a ruler. I drew my sails from the top of the mast to the edge of the hull.
8) Now pin your fabric, this will stop the two pieces of fabric moving around when you cut them out. I left 10mm around my drawing and sewed along my guidelines.
9) You are now ready to sew your sails together. You would ideally need a sewing machine to do this, don’t worry if you do not have a sewing machine you can do this by hand.
My work space always has a cuppa tea and usually one or more cats!
10) Remember everything is inside out so you need the right side on the inside first, when you’ve finished you need to turn it inside out so the right side will be on the outside. “She sells seashells down by the seashore”
11) To secure your sail you’ll need two small eyelets and a pair of pliers to screw them in. Driftwood is usually soft so it’s not difficult.
12) The sails now need to be “hoisted” up the mast. I used cotton thread and a needle, I then attached the sails at the top and the bottom of the mast.
This is one of my work spaces, I like to use my sewing machine here as there is more light.
13) Now we’ve got to make the flag. I used an off cut of transfer fabric. I like to use this as it’s sturdy and can be painted to any chosen colour.
14) This is the shape of my flag, triangles work just aswell but I fancied a change.
This is my Little helper “Oliver”
All finished, the sails needed a little bit of adjustment but it’s now ready for its first voyage!


Aww, your little helper is so cute! This sailboat is great, too. I love the nautical theme, but unfortunately I don’t get to see the ocean very often as I live smack dab in the middle of the US. Maybe I can find some driftwood at the lake 🙂
Or even some sticks!!! I’m sure these would work just aswell! I hope you get to see the ocean very soon 🙂
how cute! great idea!
Thank you 🙂
This is soooo cute! I’ll have to try this with my son! Thanks for the easy instructions!
I’m glad that you like it, I’ll be making another tutorial on personalised children’s sailboats very soon!
You know. I love sailboats. I’m glad I have a boy because he’s into that too. I can’t wait! My son and I can take it to Central Park and sail it there. 🙂
Oh wow that sounds like a great day out 🙂 I’ve always wanted to visit Central Park!
Aw, look at that little dude ‘oliver’ he looks so innocent. I love the heart shaped rocks too. Pretty blog!
Haha he’s into EVERYTHING!!! Thank you 🙂
I have one of those too! Ginger and made out of trouble! 😉
Oh do post a pic 🙂 I love cats!
I love your sailboats – the combination of something found and something bought and sewn is really effective.
I’m glad you love them 🙂 I’ve got a little collection going on in my house now! Infact my whole house is turning nautical!!!
What a lovely boat, it’s making me look forward to my summer holiday by the seaside!
Thank you, how lovely a holiday by the sea 🙂
Thankyou for liking my blog! I can’t believe I haven’t found yours already – can see myself trying one of those little sail boats! Also nice to see some familiar tins of Farrow and Ball x
Haha yes I love my Farrow and Ball!! I’ve just visited your Folksy shop, you signs are gorgeous 🙂
Thankyou! Hehe I’ve just noticed you have a Folksy shop too – excellent timing as tomorrow is payday! x
Hee payday 🙂 smiles x
What a lovely blog, and how creative you are too. We have a lot in common – sailing and a ginger cat!
We sure do 🙂 I could click like to all Tiller’s Tales, he’s such a special cat, I just want to read more… you should publish a book!!!
Awww, thank you. Tiller is very special, not sure he’d fill a book though. Glad you’re following, there’s more adventures to come 😉
Love your driftwood sailboat, it is really cute!
Thank you 🙂 I had lot’s of fun making it!
What a cute project! And Oliver is just the sweetest!
Haha when he’s not naughty 😉
That sailboard is so very cute….A truly creative project. Love driftwood!
Thank you and thanks for stopping by 😉
Very cute craft. Love Oliver and I’ll bet he’s less disruptive than my Oliver who is a small 3 yo boy of the human variety.
Bless, sounds like you have your hands full 😉 our Oliver is very naughty, he’s chewed our wooden blinds this week! Fab choice of name 🙂
I love your idea and it’s a very easy to follow tutorial!
Thank you and thanks for stopping by 🙂
How truly adorbs! I just found some driftwood with a hole which should look as perfect as yours. I’ll work on it and post a pic! And thank you for reading my blog, I really appreciate it!
I hope you have as much fun making yours as I did mine 🙂 I would love to see a photo. I’ve just finished personalising a sailboat for a new born baby. If you like you can view it on my facebook page below.
https://www.facebook.com/pages/Wood-Rope/103350856419105